Wednesday, September 25, 2019

Quick & Easy way to create XSD from Dynamics 365 for finance and operations


If you are looking for an quick & easy way to create XSD (schema) from Dynamics 365 for finance and operations. Below is the way,

Select the entity for which the XSD must be created and choose target data format as ‘XML-Element’
 

    Export the data.


 Download the XML file.
 Open the file in Visual Studio and click XML -> Create Schema

The XSD file will be generated, which can be shared with 3rd party applications.

Friday, July 6, 2018

Testing Data Management 'Enqueue' and 'Dequeue' jobs in Dynamics 365 for Finance & Operations in Postman tool

This post is about testing the D365FO Data Management 'Enqueue' and 'Dequeue' recurring data jobs.
Well, what are these? They are simply REST API's from Data management framework to support recurring integrations for importing(Enqueue) and exporting(Dequeue) data in D365FO.
Which also means, we can test these services through code or through any of the testing tools that work with REST API's.
There is already an sample project in GitHub which can be configured for this.
However, if you need to quickly test the service, with a simple tool like Postman or SOAPUI, below process can be followed.

Since D365FO, uses OAuth 2.0 as authentication, the first step would be to create an access token.
This step would generate the token which is required for all the communication to D365FO.
It has to be passed for each request, through the header as ‘Authorization’ = Bearer {Token generated}.


Please create ‘POST’ request for the url : https://login.microsoftonline.com/[tenant-Id]/oauth2/token
The body of the request must contain the below values:
grant_type:client_credentials
client_Id:'Id of your App' [Registering your application in Azure active directory is the first thing that has to be done to enable integrations]
client_secret:'secret key of your App'
resource:[D65FO base URL]


Upon a successful request, you should be seeing status=’200 OK’ and the access token generated in the response body section.

The response, will be the token generated in the body section:
Once the token is generated, it can be used for each of the requests.

Below example is for Customer Groups:

Dequeue API:
To test the dequeue service[Receiving data from D365], create a ‘GET’ request for the below url:
Format: https://[D65FO base URL]/api/connector/dequeue/%7B<Activity ID>%7D


The activity ID can be obtained once the export job is enabled for recurring data Job in data management.

Upon success, you should get status=’200 OK’ and the download location of the file as a response.


To download the file, you would have to create another ‘GET’ request for the ‘download location url’ that is received as response.

The content of the file will be shown in the body section once the request is successful.

Enqueue API:
To test the enqueue service [Sending data to D365FO], create ‘POST’ request for the below url:
Format: https://<base URL>/api/connector/enqueue/%7B<activity ID>%7D?entity=<entity name>
Ex:https://[D65FO base URL]/api/connector/enqueue/%7B[Activity ID]7D?entity=Customer%20Groups&company='company name'

You can send data in multiple ways:
Directly paste the contents of the file into the 'Raw' section of Body:
The format matching the one defined in source format in D365FO.
You can provide any kind of data mathcing the types supported in the 'Text' types as shown below:

Or you can also attach the file directly, in the 'form-data' section of the body.
Click 'Choose files' button and attach the file.


You can also use the 'Binary' section.
This section allows you to send things which you can not enter in Postman, for example, image, audio, or video files. You can send text files as well,in the 'Binary' section of Body.
Click 'Choose files' button to attach the file having data to be imported to D365FO.


Upon success, you should get status=’200 OK’ and the number of ‘Job ID’ created in D365 as response.

Once you have this JobID, You can also check the status of this job, through below url format:
https://[D65FO base URL]/api/connector/jobstatus/%7B<ActivityID>%7D?JobId={Job Id generated}
It will return the status of that job in D365FO, whether it is in Queue,Processing,Processed etc.

As mentioned in the beginning, the access token has to passed to all the requests mentioned in the above steps.

Tuesday, June 12, 2018

Testing Odata actions for instance methods in Dynamics 365 for Finance and Operations

The details for testing an Odata action for a static method has been described in my previous post (http://vishwad365fo.blogspot.com/2018/05/testing-odata-actions-in-d365.html).

In this post, I would like to share the changes to be made to call an instance method.

If you have noticed the Odata action in the standard data entity 'ProjectEntity'

 [SysODataActionAttribute("GetProjectTypes", true),
     SysODataCollectionAttribute("return", Types::String)]
    public List GetProjectTypes()
    {
        DictEnum enumDict = new DictEnum(enumName2Id(enumstr("ProjType")));
        List enumLabels = new List(Types::String);
        int i ;
        str enumValue;

        for (i = 0; i < enumDict.values(); i++)
        {
            enumValue = enumDict.index2Label(i);
            if (enumValue != "")
            {
                enumLabels.addEnd(enumValue);
            }
        }
        return enumLabels;

    }

The second parameter, highlighted in 'Yellow' which is set to 'true', in the above code, signifies that it is an instance method.
So, if it is an static method, it has be set to 'false'.

So, we know how to call the static Odata actions, but will the same syntax work for instance methods?
No.
We have to make certain changes for that, since for the instance methods, we have to first select the data/record. As simple as selecting the table buffer first and then calling its instance methods.
In order to do that, we will have to pass 'primary key' for the entity and also the data area Id.

Syntax is as below:
https://<Base URL>/data/'dataentity name'('primary key', 'dataAreaId')/Microsoft.Dynamics.DataEntities.'Odata action method name'

For an Project entity, it would be:
https://<Base URL>/data/Projects(ProjectID='Proj-001', dataAreaId='USRT')/Microsoft.Dynamics.DataEntities.GetProjectTypes


Tuesday, May 22, 2018

'PostLoad' method of Data entity in Dynamics 365 for finance and operations

I have seen lot of developers using 'PostLoad' method to implement most of their business logic related to integrations.

But, if you are writing any logic that is specific to the export process.
For ex: Setting any flags after export, or initiating any process after the export is done and so on.

We have to keep in mind that entities are not just used for Asynchronous but also for Synchronous scenarios.
The PostLoad() method will be executed every time the data is loaded.
For ex: 
1) When that particular data entity is opened through 'Open in excel'/Excel       Addin feature.
2) Whenever there is an get request against that entity
 - A simple 'Get' request from browser or any other tools.
   (Through the Odata endpoint -https://[Base URL]/data/'YourEntity') 
 - Use of 'Odata feed' in Excel or any other tools.

So we have to ensure that, there will not be any such logic written, which would be executed unnecessarily.

Thursday, May 3, 2018

Custom service to create Sales order with lines in Dynamics 365 and testing it

As you might know, 'composite entities' are not supported in Odata and are meant only to be used in Data management.

Which means we cannot use a single service or single odata endpoint to create a SO and also that there can be only asynchronous way to leverage it.

What if we have to create a synchronous service to create Sales order in D365?
Yes, there are standard entities for Sales order header and sales order line, which can be used separately.

But in that case, it will be the responsibility of the caller to:
-Call the header service first. 
-Check if header is inserted correctly 
-Call line service.

Even with this approach there are certain limitations:
-What if any one of the sales line fails, and is not created in D365?
It has to be rolled back. Then what happens to the Header which was already created in the previous call?
A new delete request must be sent to delete the header.

If the caller of the service will not be able to do this complete roll back , during any error or if they are not fine making 3 separate calls to create SO.

We can go for custom service in such cases, as it gives these benefits:
-Roll back capability, as we can write code to handle this.
-Give a single endpoint, to the caller to consume, which means through a single endpoint the complete sales order along with lines can be created.

What are all needed for this?
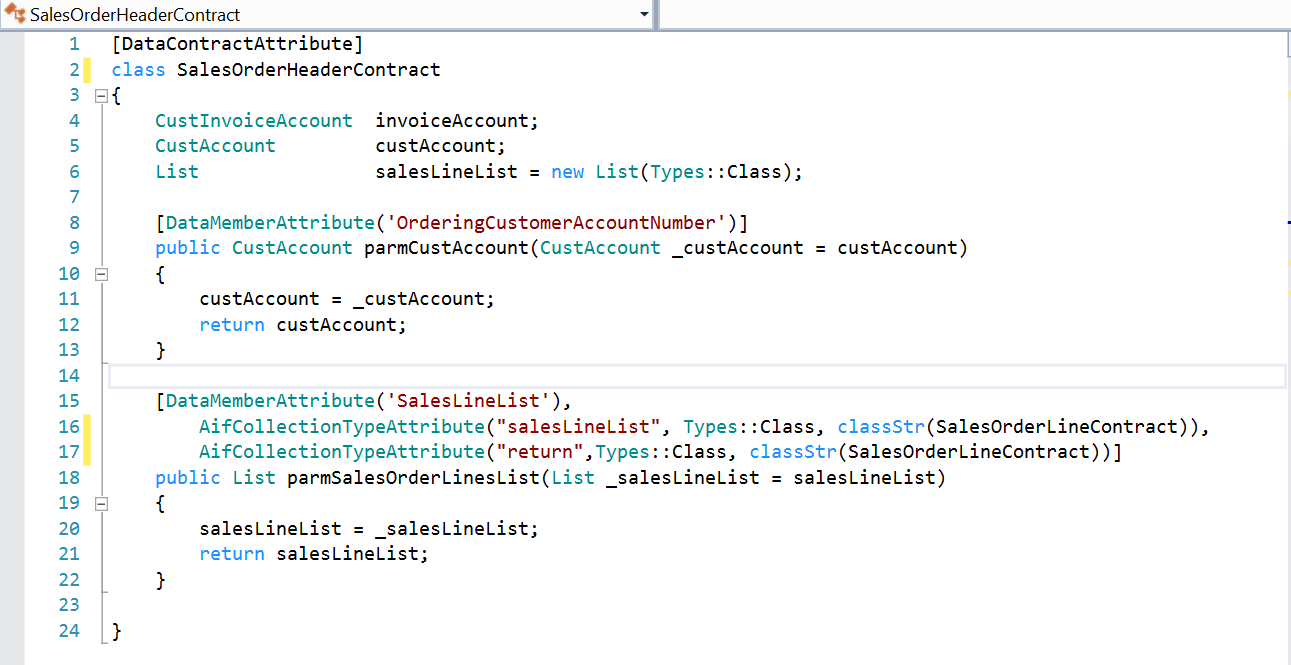
Firstly creating a contract class.
One header contract class and an line contract class.
Header contract class must also accept the list of line contract object class to support 1:N scenario.

Below is an example for a simple contract classes:
Header contract class, that has two methods:
-Customer account number for which sales order has to be created.
-A method that accepts the list of sales line contract class objects.


Line contract class:
-A method for 'Item number'
-A method of the 'Qty'

Then a service class that has all the logic to accept this contract classes and create a SO in D365.

class CreateSOService extends SysOperationServiceBase
{
    public str createSO(SalesOrderHeaderContract  _contract)
    {
        str                                 result;
        SalesTable                    salesTable;
        SalesLine                      salesLine;
        SalesId                          salesId;
        NumberSeq                   numberSeq;
        ListEnumerator              salesLineListEnumerator  = _contract.parmSalesOrderLinesList().getEnumerator();
        SalesOrderLineContract   salesOrderLineContract;
            
        try
        {           
            ttsbegin;
            numberSeq = NumberSeq::newGetNumFromId(SalesParameters::numRefSalesId().NumberSequenceId);
            salesId = numberSeq.num();
            salesTable.SalesId = salesId;
            salesTable.initValue();
            salesTable.CustAccount = _contract.parmCustAccount();
            salesTable.initFromCustTable();
            salesTable.LanguageId = "en-us";

            if(salesTable.validateWrite())
            {
                salesTable.insert();
            } 
            else
            {            
                throw Exception::Error;
            } 

            while(salesLineListEnumerator.moveNext())
            {
                salesOrderLineContract = salesLineListEnumerator.current();
                if(salesOrderLineContract)
                {
                    salesLine.clear();
                    salesLine.initFromSalesTable(salesTable);
                    salesLine.ItemId = salesOrderLineContract.parmItemNumber();
                    salesLine.QtyOrdered = salesOrderLineContract.parmOrderedSalesQty();
                    salesLine.SalesQty = salesOrderLineContract.parmOrderedSalesQty();;
                    
                    if(salesLine.validateWrite())
                    {
                        salesLine.createLine(true, true, true, true, true, true);
                    }
                    else
                    {
                        throw Exception::Error;
                    }
                }
            }
            ttscommit;
            if(SalesTable::exist(salesId))
            {
                result = strfmt("Success: Sales order '%1' is successfully created", salesId);
            }
        }
        catch(Exception::CLRError)
        {
            result =  enum2Str(Exception::CLRError);
        }
        catch(Exception::Error)
        {         
            result = "Insertion failed: Data validation error";
        }
        return result;
    }

}

Now that the required objects are ready.
It can be attached to the service node and then to service group.
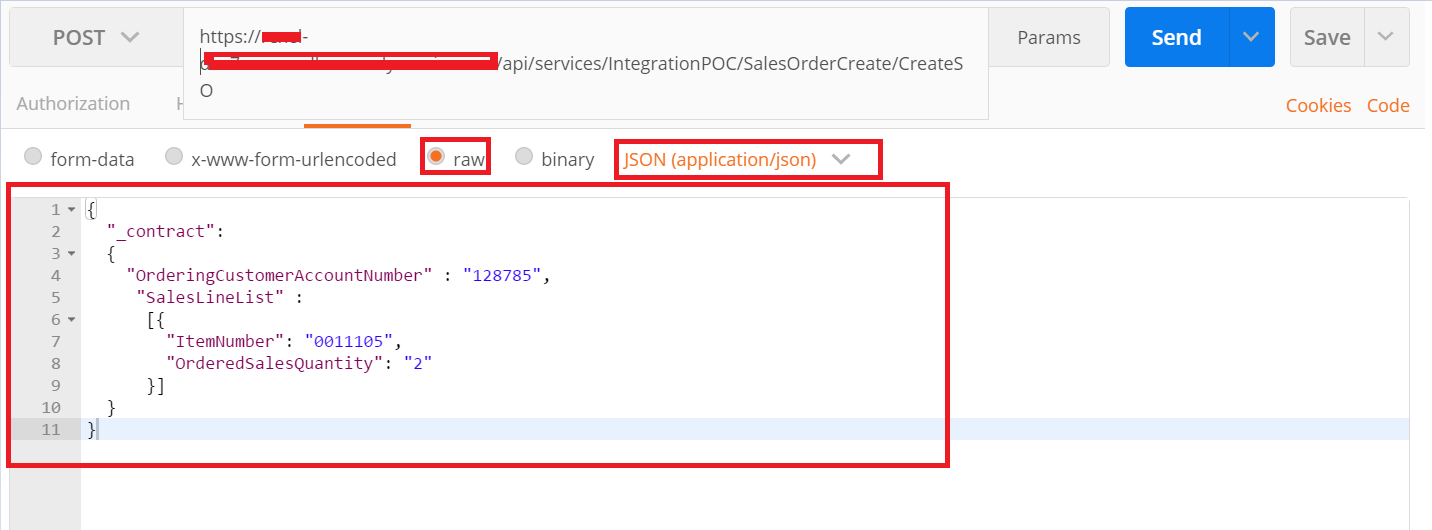
Post the build, the service is ready to be consumed, deployed as per below url:
https:[Your organization's root URL]/api/services/service_group_name/service_group_service_name/operation_name

Now, if it has to be tested in any of the tools, apart from writing code and consuming it in any visual studio console applications.
We can use 'Postman' here.

A post request can be created in postman to call the service:

The input can be passed, in the body section, as shown below screenshot.


Upon clicking 'Send', a Sales order along with lines will be created in D365.
The response will be shown on the postman lower body section, as below:


It is the response, which is provided in the service class code, mentioned above.
You can verify if the SO is created in D365.

Testing Odata actions in Dynamics 365

With new Odata actions, we can now expose any custom business logic from D365, without having to create an custom service.
Apart from using the data entities for data integrations, we can also create and expose the methods too, as Odata actions.They can be used for the process integrations.

For example, using a SalesTable entity to create an Odata action to confirm or invoice the sales order.

Here is the simple example on testing the Odata actions in D365, using a tool called 'Postman'.

For the basic setup and for authentication the below url can be followed:


In this example, I have created a new static method for my custom entity.
The only new thing is, it has been decorated with [SysODataActionAttribute]


This method will invoice the sales order id that has been passed as the argument.
[Your organization's root URL]/data/[Your data entity]/Microsoft.Dynamics.DataEntities.['Method name']

For passing the parameter for the method, we can use the body section:


On clicking the 'Send' button for the POST request, the called method will be executed.

We can go back to D365FO to check if this succeed.
Below is the screenshot, where the mentioned sales order has been invoiced.


So, with this way we can create and expose the custom methods as Odata actions.
The example is for static method, but you can also try with the instance method for the data entity.


Quick & Easy way to create XSD from Dynamics 365 for finance and operations

If you are looking for an quick & easy way to create XSD (schema) from Dynamics 365 for finance and operations. Below is the way, ...