This post is about testing the D365FO Data Management 'Enqueue' and 'Dequeue' recurring data jobs.
Well, what are these? They are simply REST API's from Data management framework to support recurring integrations for importing(Enqueue) and exporting(Dequeue) data in D365FO.
Which also means, we can test these services through code or through any of the testing tools that work with REST API's.
There is already an sample project in GitHub which can be configured for this.
However, if you need to quickly test the service, with a simple tool like Postman or SOAPUI, below process can be followed.
Since D365FO, uses OAuth 2.0 as authentication, the first step would be to create an access token.
This step would generate the token which is required for all the communication to D365FO.
It has to be passed for each request, through the header as ‘Authorization’ = Bearer {Token generated}.

Please create ‘POST’ request for the url : https://login.microsoftonline.com/[tenant-Id]/oauth2/token
The body of the request must contain the below values:
grant_type:client_credentials
client_Id:'Id of your App' [Registering your application in Azure active directory is the first thing that has to be done to enable integrations]
client_secret:'secret key of your App'
resource:[D65FO base URL]

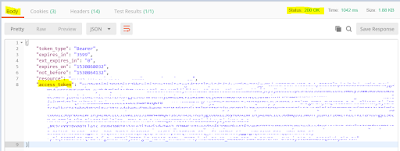
Upon a successful request, you should be seeing status=’200 OK’ and the access token generated in the response body section.
The response, will be the token generated in the body section:
 Once the token is generated, it can be used for each of the requests.
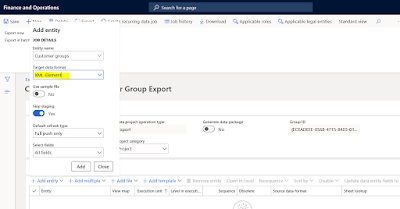
Below example is for Customer Groups:
Dequeue API:
To test the dequeue service[Receiving data from D365], create a ‘GET’ request for the below url:
Format: https://[D65FO base URL]/api/connector/dequeue/%7B<Activity ID>%7D

The activity ID can be obtained once the export job is enabled for recurring data Job in data management.

Upon success, you should get status=’200 OK’ and the download location of the file as a response.
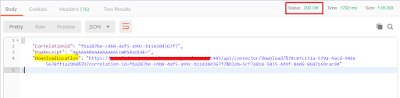
To download the file, you would have to create another ‘GET’ request for the ‘download location url’ that is received as response.
The content of the file will be shown in the body section once the request is successful.
Enqueue API:
To test the enqueue service [Sending data to D365FO], create ‘POST’ request for the below url:
Format: https://<base URL>/api/connector/enqueue/%7B<activity ID>%7D?entity=<entity name>
Ex:https://[D65FO base URL]/api/connector/enqueue/%7B[Activity ID]7D?entity=Customer%20Groups&company='company name'
You can send data in multiple ways:
Directly paste the contents of the file into the 'Raw' section of Body:
The format matching the one defined in source format in D365FO.
 You can provide any kind of data mathcing the types supported in the 'Text' types as shown below:

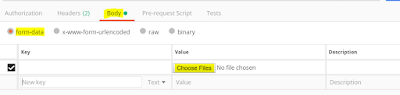
Or you can also attach the file directly, in the 'form-data' section of the body.
Click 'Choose files' button and attach the file.
You can also use the 'Binary' section.
This section allows you to send things which you can not enter in Postman, for example, image, audio, or video files. You can send text files as well,in the 'Binary' section of Body.
Click 'Choose files' button to attach the file having data to be imported to D365FO.

Upon success, you should get status=’200 OK’ and the number of ‘Job ID’ created in D365 as response.
Once you have this JobID, You can also check the status of this job, through below url format:
https://[D65FO base URL]/api/connector/jobstatus/%7B<ActivityID>%7D?JobId={Job Id generated}
It will return the status of that job in D365FO, whether it is in Queue,Processing,Processed etc.

As mentioned in the beginning, the access token has to passed to all the requests mentioned in the above steps.
Well, what are these? They are simply REST API's from Data management framework to support recurring integrations for importing(Enqueue) and exporting(Dequeue) data in D365FO.
Which also means, we can test these services through code or through any of the testing tools that work with REST API's.
There is already an sample project in GitHub which can be configured for this.
However, if you need to quickly test the service, with a simple tool like Postman or SOAPUI, below process can be followed.
Since D365FO, uses OAuth 2.0 as authentication, the first step would be to create an access token.
This step would generate the token which is required for all the communication to D365FO.
It has to be passed for each request, through the header as ‘Authorization’ = Bearer {Token generated}.

Please create ‘POST’ request for the url : https://login.microsoftonline.com/[tenant-Id]/oauth2/token
The body of the request must contain the below values:
grant_type:client_credentials
client_Id:'Id of your App' [Registering your application in Azure active directory is the first thing that has to be done to enable integrations]
client_secret:'secret key of your App'
resource:[D65FO base URL]

Upon a successful request, you should be seeing status=’200 OK’ and the access token generated in the response body section.
The response, will be the token generated in the body section:

Below example is for Customer Groups:
Dequeue API:
To test the dequeue service[Receiving data from D365], create a ‘GET’ request for the below url:
Format: https://[D65FO base URL]/api/connector/dequeue/%7B<Activity ID>%7D

The activity ID can be obtained once the export job is enabled for recurring data Job in data management.

Upon success, you should get status=’200 OK’ and the download location of the file as a response.

To download the file, you would have to create another ‘GET’ request for the ‘download location url’ that is received as response.
The content of the file will be shown in the body section once the request is successful.
Enqueue API:
To test the enqueue service [Sending data to D365FO], create ‘POST’ request for the below url:
Format: https://<base URL>/api/connector/enqueue/%7B<activity ID>%7D?entity=<entity name>
Ex:https://[D65FO base URL]/api/connector/enqueue/%7B[Activity ID]7D?entity=Customer%20Groups&company='company name'
You can send data in multiple ways:
Directly paste the contents of the file into the 'Raw' section of Body:
The format matching the one defined in source format in D365FO.


Or you can also attach the file directly, in the 'form-data' section of the body.
Click 'Choose files' button and attach the file.

You can also use the 'Binary' section.
This section allows you to send things which you can not enter in Postman, for example, image, audio, or video files. You can send text files as well,in the 'Binary' section of Body.
Click 'Choose files' button to attach the file having data to be imported to D365FO.

Upon success, you should get status=’200 OK’ and the number of ‘Job ID’ created in D365 as response.
Once you have this JobID, You can also check the status of this job, through below url format:
https://[D65FO base URL]/api/connector/jobstatus/%7B<ActivityID>%7D?JobId={Job Id generated}
It will return the status of that job in D365FO, whether it is in Queue,Processing,Processed etc.

As mentioned in the beginning, the access token has to passed to all the requests mentioned in the above steps.